JULY 09, 2025
Excel
Microsoft Excel is a powerful tool for data management, but one limitation is that its Excel drop-down lists only allow single selection by default.
However, there are different ways to create a multi-select dropdown list, saving you hours of data cleanup and improving data entry efficiency.
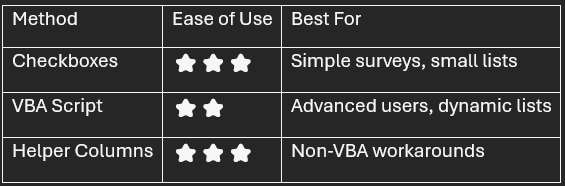
In this comprehensive guide, we’ll cover three best practices—using Form Controls (checkboxes), Excel VBA code, and helper columns—so you can choose the method that fits your specific needs.
💡You may also want to see How to Find Duplicate Values in Two Excel Columns.
This is the simple way to allow multiple selections without complex coding.
Step 1: Enable the Developer Tab
Go to File > Options > Customize Ribbon.
Check the Developer tab and click OK.
Step 2: Insert Checkboxes
Click the Developer tab > Insert > Check Box (Form Control).
Draw checkboxes next to your list of choices (e.g., in different columns).
Right-click a checkbox > Format Control > Control tab and link it to a selected cell.
Step 3: Organize Selected Items
Use the TEXTJOIN function to combine selected items into a single cell:
Excel:
=TEXTJOIN(“, “, TRUE, IF(B2:B10=TRUE, A2:A10, “”))
(Press Ctrl+Shift+Enter for an array formula in older Excel versions.)
✔ Pros: Easy for beginners, no VBA required.
✖ Cons: Manual setup for large list of entries.
If you need a true drop-down menu with multi-select, Visual Basic (VBA) is the only way.
Step 1: Open the VBA Editor
Press Alt + F11 to open the VBA Editor.
Double-click your Excel sheet in the Project Explorer.
Step 2: Insert the Following VBA Code
Paste this VBA script into the module:
Private Sub Worksheet_Change(ByVal Target As Range)
Dim xRng As Range
Dim oldValue As String
Dim newValue As String
On Error GoTo ExitSub
If Target.Count > 1 Then Exit Sub
Set xRng = Me.Range(“A2:A10”) ‘Change to your drop-down range
If Intersect(Target, xRng) Is Nothing Then Exit Sub
Application.EnableEvents = False
newValue = Target.Value
Application.Undo
oldValue = Target.Value
Target.Value = newValue
If oldValue <> “” Then
If newValue <> “” Then
Target.Value = oldValue & “, ” & newValue
End If
End If
ExitSub:
Application.EnableEvents = True
End Sub
Step 3: Set Up a Data Validation List
Select a cell (e.g., C2).
Go to Data tab > Data Validation > List.
In the Source box, enter your list of values (e.g., A2:A10).
✔ Pros: Works like a real dropdown box with multi-select.
✖ Cons: Requires a macro-enabled workbook and basic VBA knowledge.
A neat trick for tracking multiple selections without VBA.
Step 1: Create a Regular Drop-Down List
Select a cell > Data > Data Validation > List.
Enter your source data (e.g., Team Members in A2:A10).
Step 2: Use Helper Columns to Log Selections
When a user selects an item, record it in a separate worksheet or different location.
Use conditional formatting to highlight selected values.
Step 3: Combine Selections with TEXTJOIN
Excel:
=TEXTJOIN(“, “, TRUE, B2:B10)
(Where B2:B10 contains logged selections.)
✔ Pros: No VBA, works in Google Sheets too.
✖ Cons: Requires manual tracking.
💡You may also want to see How to Add a Third Axis in Excel with a Chart or Graph.
❌ Error: “Unable to set the List property” → Check your named range or source field.
❌ VBA not working? → Ensure macros are enabled (File > Options > Trust Center).
❌ Blank cells in drop-down? → Adjust your source range to exclude empty cells.
While Excel’s built-in data validation feature doesn’t support multi-select natively, these advanced techniques give you the flexibility to build a multi-select drop-down list for spreadsheet tasks.
By the end of this tutorial, you’ll have a working solution—whether you prefer check boxes, VBA, or helper columns.
💡 Pro Tip: For data organization, consider using an Excel Table or Pivot Table to manage selections efficiently.
Important: This post is for informational and educational purposes only. This post should not be taken as therapy advice, financial advice or used as a substitute for such. You should always speak to your own therapist or financial advisor before implementing this information on your own. Thank you!